
Probar 200 mil millones de contraseñas de ocho caracteres en 48 minutos (¡Las contraseñas han muerto!)
Noticias de Seguridad Informática – Segu… by noreply@blogger.com (SeguInfo) / October 18, 2022 at 04:23PM
El investigador, Sam Croley, experto en cifrado de contraseñas y desarrollador principal en Hashcat, dijo que la GPU RTX 4090 alcanzó velocidades récord de 300GH/seg. y 200kh/seg. Un sistema de 8 RTX 4090 podría probar 200 mil millones de combinaciones de contraseñas de ocho caracteres en solo 48 minutos en la modalidad de fuerza bruta y utilizando HashCat.

En 2011, el investigador de seguridad Steven Meyer demostró que una contraseña de ocho caracteres (53 bits) podría forzarse por fuerza bruta en 44 días, o en 14 segundos si usa una GPU y tablas arcoíris: tablas precalculadas para invertir funciones hash.
Ahora, en las nuevas pruebas, el equipo de IT Pro atacó el protocolo de autenticación NTLM (New Technology LAN Manager) de Microsoft, muy utilizado en las redes empresariales para autenticar la identidad de los usuarios, y también con la función Bcrypt de uso común para el descifrado de contraseñas.
La que un investigador expresó su asombro ante los resultados de una comparativa, donde la tarjeta alcanzó “una mejora demencial de más de 2 veces con respecto a la tarjeta predecesora, la 3090, en casi todos los algoritmos.
La publicación también cita un tuit, a cuyo juicio un equipo equipado con ocho GPU RTX 4090, permitiría a un intruso probar todas las combinaciones (200.000 millones) de contraseñas de ocho caracteres en solo 48 minutos utilizando métodos de fuerza bruta. Esto es mucho más rápido que las dos horas y media que se tardaría en conseguir los mismos resultados con la 3090, la anterior tarjeta insignia de NVIDIA, e incluiría contraseñas con mayúsculas, minúsculas, símbolos y números aleatorios.
A 1.699 euros por unidad, sigue siendo un hardware enfocado al consumidor y ampliamente disponible en el comercio. “Esto puede hacer que la GPU sea una inversión valiosa para los actores de amenazas, que ahora pueden potenciar sus sistemas de intrusión a través de canales legítimos”, escribe la publicación.
Sin embargo, los expertos que hablaron con IT Pro recalcan que hay limitaciones para este tipo de ataques en el mundo real, incluso con un hardware potente que los respalde. “Este tipo de dispositivos suele utilizarse para descifrar contraseñas offline, ya que las soluciones online suelen ser resistentes a este tipo de vectores de ataque”, comentó Grant Wyatt, director de operaciones de MIRACL.
Dado que la mayoría de las contraseñas creadas por los usuarios no son secuencias aleatorias, sino que tienden a seguir patrones de palabras de uso común, los atacantes pueden en la práctica llegar a la contraseña correcta mucho antes. Si una RTX 4090 recorriera una lista de sólo los cientos de contraseñas más probables para una cuenta, podría hacerlo en milisegundos.
El experto puso de relieve que el riesgo es especialmente alto para las contraseñas que se comparten entre los empleados y que son fáciles de recordar. Los ataques de diccionario funcionan precisamente así, con un equipo que utiliza una lista de las contraseñas más comunes y palabras dentro de las contraseñas para acelerar el proceso de fuerza bruta.Fuente: ITPro
Qué es una VPN, cómo funciona y cómo te puede ayudar
La noticia Qué es una VPN, cómo funciona y cómo te puede ayudar fue publicada originalmente en Genbeta por Marcos Merino .
Es probable que, en alguna ocasión, te hayas encontrado con las siglas ‘VPN’. Su significado es ‘Virtual Private Network’ o, en español, ‘Red Privada Virtual’; un nombre adecuado para nombrar una tecnología que, fundamentalmente, trata sobre crear un ‘mini-internet dentro de Internet’ que conecta directamente dos o más dispositivos, aunque no estén físicamente conectados entre sí.
Y, además, lo hace encriptando los datos que esos dispositivos intercambian a través de la red, por lo que evita que puedan ser interceptados. Suma a eso que oculta tu dirección IP —los sitios web a los que intentes conectarte recibirán la petición desde el servidor VPN, no desde tu equipo— y sabrás por qué quienes valoran la privacidad y seguridad de su conexión suelen recurrir a esta herramienta.
Ojo, no es que garantice un anonimato absoluto: tu proveedor de Internet podrá saber que estás conectado a esa VPN, pero ciertamente no podrá saber a dónde te conectas ni qué haces desde la misma.
Además, nuestro proveedor de Internet no puede acceder a nuestras comunicaciones, pero el propio servidor VPN sí podría hacerlo si resultara ser malicioso: por eso es tan importante hacer uso de un servicio VPN fiable

Así funciona:
- Cuando nos conectamos a un servicio VPN, la conexión se establece entre un software cliente y un servidor VPN online. Para ello, se pueden usar varios protocolos de tunelización que varían entre sí en aspectos como la estabilidad o la velocidad de la conexión.
- Una vez establecida la conexión (previa autenticación, habitualmente), el servidor aplica un protocolo de cifrado a todos los paquetes de datos que intercambia con el cliente.
- Dichos paquetes se introducen en otros paquetes externos en un proceso conocido como encapsulación, para reforzar la seguridad de los datos. Estos paquetes encapsulados son los que viajan por el ‘túnel’ VPN y sólo se ‘desembalan’ en cada uno de los extremos receptores de la conexión.
El uso de VPNs cuenta con una desventaja obvia: una conexión a Internet más lenta (cada paquete de información debe pasar ahora por un servidor intermedio)
Antecedentes…
El origen de la tecnología VPN se remonta a 1996, cuando un empleado de Microsoft, Gurdeep Singh-Pall, desarrolló el primer protocolo de tunelización, el PPTP (siglas de ‘peer-to-peer tunneling protocol’). En un primer momento, el uso de esta tecnología se enfocó únicamente a los entornos corporativos, necesitados de medidas de seguridad adicionales ante la necesidad de abrirse al recién creado Internet.
Sin embargo, con el auge tanto de los ciberataques como de los sistemas de cibervigilancia desde el comienzo de este siglo, cada vez más gente se hizo consciente de las ventajas de su uso para los usuarios individuales. Más tarde, entre 2016 y 2018, el número de usuarios de VPN en todo el mundo llegó a cuadruplicarse —según el GlobalWebIndex—. Pero, ¿para qué es usada esta tecnología?

¿Qué es un proxy y en qué se diferencia de un VPN?
Habitualmente, accederemos a los servicios VPN instalando la aplicación (móvil o para PC) específica de cada uno, pero a veces es posible usarlos mediante extensiones del navegador… ¡o hasta configurándolos en nuestro router!
¿Por qué necesito una VPN?
- Porque utilizas regularmente redes WiFi públicas: Esta clase de redes WiFi (habituales en hoteles, aeropuertos, cafeterías y transportes públicos) son inseguras por definición, y exponen a quien se conecta a ellas a la posibilidad de que haya un ciberatacante ‘escuchando’ (mediante técnicas de análisis de paquetes) o manipulando (mediante un ataque man-in-the-middle) sus comunicaciones. Nada de eso es posible si el tráfico web permanece tunelado y encriptado gracias a una VPN.
- Porque quieres acceder a contenidos censurados y/o restringidos geográficamente: Habitualmente las autoridades, motivadas por normativas sobre seguridad nacional, protección del copyright o similar, son capaces de impedirnos acceder a determinadas páginas y servicios online, y en otros casos son dichos servicios los que desean restringir el acceso de conexiones procedentes de determinados países. Pero, cuando nos conectamos a través de una red virtual privada, la conexión al servidor web se realiza desde una IP de país donde se localiza el servidor VPN, por lo que los bloqueos por criterios geográficos pierden toda efectividad.
Es habitual usar VPNs para, por ejemplo, acceder a contenidos de servicios de streaming que problemas de licencias impiden visualizar en nuestro propio país
- Porque trabajas en remoto: Muchas empresas ya exigen el uso de servicios VPN a la hora de otorgar acceso a su red corporativa a los empleados que se conectan desde el exterior. Una conexión en la que no mediase el cifrado de la VPN sería vulnerable a un robo de credenciales, lo que podría poner en peligro la seguridad de toda la empresa (y la confidencialidad de sus datos).
- Si eres streamer y/o gamer: Ya hemos dicho que una VPN oculta qué dirección IP estamos usando. Y lo que la gente no conoce, no lo puede atacar: tanto el mundo de los videojuegos como el streaming puede ser muy competitivo cuando hay dinero de por medio, y no es raro que se lleven a cabo ataques DDoS con el fin específico de hacer caer una conexión durante una emisión o una partida.
¿Cuál es la mejor VPN gratis?
Si bien recurrir a aplicaciones VPN de pago suele considerarse la mejor solución, existen diversos servicios VPN gratuitos fiables y conocidos, incluso si normalmente alguna de las características del servicio que presten sea inferior a las de las primeras (puede imponer limitaciones en la velocidad, en la cantidad de datos, en el número/variedad de ubicaciones disponibles, etcétera).
Puedes comprobar cuál se ajusta más a tus necesidades accediendo a nuestro reciente artículo ‘VPN gratis: en cuáles puedes confiar y en cuáles no‘.

Guía a fondo sobre conexiones VPN en el móvil: qué son y por qué puedes necesitar una
¿Cómo me puedo conectar a una VPN?
En el caso de que quieras recurrir a un servicio VPN de terceros, sólo tienes que instalar su aplicación correspondiente en Windows, abrirla y pulsar el preceptivo botón de ‘Conectar’ (en el caso de que no lo haga automáticamente). Eso sí, puede que antes te pida configurar alguna opción (depende de cada app, y existen docenas y docenas).
Existe también un botón de ‘Agregar VPN’ en ‘Configuración de Windows > Red e Internet > VPN‘, pero sólo necesitaremos recurrir a ese apartado si nos da por crear nuestra propia VPN. Si te interesa, sigue leyendo…
¿Cómo crear una VPN?
Aunque hay multitud de servicios VPN de terceros, no necesitas recurrir a ninguno de ellos para conectarte a través de una conexión VPN: puedes crear tu propia red virtual doméstica. Windows, sin ir más lejos, nos facilita (bueno, dejémoslo en ‘permite’) realizar esa tarea. Por supuesto, esa red no nos servirá para hacer pasar tu IP por extranjera, porque te estarás conectando igualmente desde España, pero sí puede proteger tu privacidad, tunelizando tus datos y enmascarando la IP de tu router cuando te conectes.
Para crearla, bastará con acceder a ‘Red e Internet’ dentro de la Configuración de Windows. En Windows 10 deberemos pulsar ‘Estado > Cambiar opciones del adaptador‘, mientras que en Windows 11 iremos a ‘Configuración de red avanzada > Más opciones del adaptador de red‘. En ambos casos, se nos abrirá la misma ventana del antiguo ‘Panel de Control’, una que nos mostrará las conexiones que tengamos creadas. Allí, pulsaremos F10 para mostrar un menú oculto con más opciones, que nos permitirá hacer clic en ‘Archivo > Nueva conexión entrante‘.

Al hacerlo, nos aparecerá una ventana titulada “¿Quién puede conectarse a este equipo?” y un listado de cuentas de usuario; debajo, tendremos un botón de ‘Agregar a alguien’ que nos permitirá crear una cuenta de usuario y establecer su contraseña. Hazlo: los datos que establezcas serán los que nos permitirán crear la coenxión VPN después.
Una vez creado, pasarás a una pantalla en la que Windows preguntará cómo se va a conectar este usuario a tu red: debes seleccionar la opción ‘A través de Internet’. Así, el nombre de usuario que has creado será para conectarse a la red formando una VPN. Tras pulsar en ‘Siguiente’, pasaremos a otra pantalla que nos mostrará protocolos de red. Aquí, tienes que seleccionar la opción ‘Protocolo de Internet versión 4’ y pulsar en ‘Propiedades’.
¿El objetivo? Evitar que la nueva conexión utilice nuestra IP por defecto, y cambiarla por un nuevo rango de IPs que estén dentro de tu dirección IP. Tranquilo, te lo iremos explicando. Lo primero, selecciona la opción ‘Especificar direcciones IP’. Ahora, vete a ‘Inicio > Ejecutar’ y abre una aplicación llamada ‘ipconfig’: se abrirá una ventana de terminal mostrando varias direcciones IP; apunta la ‘Puerta de enlace predeterminada’ (la IP de tu router) y vuelve a donde estábamos para escribir las mismas tres primeras series de números… pero luego cambia el último número indicando un rango de IPs tan amplio como IPs quieras asignar a tu VPN.

Si la IP de nuestro router fuera ‘99.99.99.1’, un ejemplo del rango de IPs que podríamos proporcionarle a la configuración en este punto sería la del ejemplo.
Una vez escrito el rango de IPs, pulsa en ‘Aceptar’, y volverás a la pantalla de software de red. Aquí ya habrás terminado de configurarlo todo, por lo que solo te queda pulsar en el botón de ‘Permitir acceso’, y Windows procederá a crear tu servidor VPN. Tras eso, deberás entrar en la configuración de tu router para abrir el puerto 1723 creando una nueva ‘regla manual’; te pedirá la dirección IP de tu PC (no la de tu router), por lo que debes volver a abrir ‘ipconfig’ y apuntar el dato ‘Dirección IPv4’.
Cuando hayas terminado allí, debes acceder a ‘Panel de Control > Sistema y seguridad > Firewall de Windows Defender > Permitir que una aplicación o una característica a través de Firewall de Windows Defender‘. Ahí, pulsaremos en el botón de ‘Cambiar la configuración’ y aceptaremos dar permisos de administrador. Aquí, tienes que activar las casillas Privada y Pública de la opción de Enrutamiento y acceso remoto, que aparece en la lista.
Ahora, vuelve a abrir ‘ipconfig’ y apunta la nueva ‘Dirección IPv4’, vete a ‘Configuración > Red e Internet > VPN‘ y, tras pulsar en el botón ‘Agregar VPN’, indica esta nueva dirección IP. En la nueva ventana que se te abra elige ‘Windows’ como ‘Proveedor de VPN’, en ‘Nombre de servidor o dirección’, la primera ‘Dirección IPv4’ que te salió y finalmente escribe el nombre de usuario y contraseña que creaste al comienzo de este proceso. ¡Listo, ya tienes tu conexión VPN en marcha!
Una VPN que recomendamos
NordVPN es uno de los líderes del sector VPN; numerosos websites de reseña de VPN lo señalan hoy en día como la mejor opción del mercado. También es uno de los veteranos del sector: lanzó su servicio hace ahora 10 años, cuando contaba con sólo 6 servidores (hoy en día cuenta con 5.200, repartidos por 59 países). Pero nuestras razones para recomendarlo son otras:
- Privacidad: NordVPN tiene su sede en Panamá, un país con fama (y leyes para respaldarla) de proteger la privacidad de las empresas. Además, sus servidores carecen de unidades de disco, realizando almacenamiento virtual en RAM, lo que les impide recopilar datos de navegación de sus usuarios y garantiza la privacidad de nuestra navegación.
- Velocidad: Además, la última comparativa de velocidad de servicios VPN publicada por AVTest situaba la velocidad de descarga de NordVPN muy (muy) por encima de la de sus principales rivales, prácticamente no notarás que estás usando un VPN mientras navegas.
Imagen | comparitech.com
–
La noticia Qué es una VPN, cómo funciona y cómo te puede ayudar fue publicada originalmente en Genbeta por Marcos Merino .
Gonzalo Garcia Pelayo de “Los Pelayo” ofrece una alternativa económica a los actuales periodos de escasez
LISTA DE PERSONAS CONOCIDAS CONECTADAS A CULTOS SATÁNICOS Y PEDOFILIA (PRESUNTAMENTE CLARO)
via LISTA DE PERSONAS CONOCIDAS CONECTADAS A CULTOS SATÁNICOS Y PEDOFILIA (PRESUNTAMENTE CLARO)
¿Miles de niños liberados del secuestro por parte de miembros de la élite mundial????
via ¿Miles de niños liberados del secuestro por parte de miembros de la élite mundial????
Basta de que solo las empresas se beneficien de tus datos, ‘mydatamood’ quiere equilibrar la balanza a favor de los usuarios

Ha pasado más de un año desde que entrara en vigor el cumplimiento obligatorio del Reglamento General de Protección de Datos (GDPR) y sin embargo, la sensación que nos queda es que poco o nada ha cambiadomás allá de aquel aluvión de emails que recibimos y los avisos de cookies y nuevas políticas de privacidad.
Si los mismos expertos no ven que se haya productido una mejorsa sustancial en ningún aspecto, y creen que la normativa no ha sido entendida ni aplicada por la mayoría de las empresas, los usuarios están aún más lejos de comprender del todo cuáles son sus derechos y cómo los protege la ley frente a la inmensa recolección de sus datos a la que se ven sometidos a diario. De este predicamento ha nacido el proyecto mydatamood.
Este sitio funciona como un intermediario para que cualquier usuario pueda ejercer a través de ellos sus derechos sobre los datos que las empresas recolectan.
Hagamos un nuevo contrato

La iniciativa de mydatamood fue creada por un grupo de profesionales españoles especializados en el área legal, de marketing e ingeniería, como una solución para aquellos usuarios que están preocupados por la privacidad de sus datos personales.

Bajo la propuesta de lo que han llamado el #NewDataDeal, el equipo conformado por Dany Bertolín, Sabina Guaylupo, y Ángela Álvarez buscan ayudar a establecer un nuevo contrato social entre las empresas y los usuarios.
En Genbeta hemos hablado con sus creadores y hemos conocido en detalle qué es lo que buscan, cómo pueden ayudarte a obtener más control sobre tus datos haciendo valer tus derechos legales, y qué esperan obtener a cambio.
Ayudar a los David que se quieren enfrentar a un Goliat

Si bien la GDPR llegó para proteger a los ciudadanos europeos de las empresas que hacen un mal uso de nuestros datos, siguen existiendo empresas que se resisten a seguir las reglas. Como usuario tienes derecho de acceder y gestionar todos los datos que cualquier tercero haya recolectado por ti, pero en muchos casos el proceso es tan complicado, y las empresas colaboran tan poco, que muchos se rinden o ni siquiera lo intentan.
Es una clásica historia de David contra Goliat, ¿quién tiene el tiempo, los recursos y el conocimiento para luchar contra una empresa gigante? La misma OCU lleva más de un año intentando demandar a Facebook para que pague a los españoles por el escándalo de Cambridge Analytica.
Ángela Álvarez, licenciada en psicología y una de las fundadoras de mydatamood, nos explica: “Esto surge de lo que le preocupa a todo el mundo, que es qué pasa con mis datos, pero que cae en un grupo de personas que tenemos más información que el resto sobre lo que está pasando con los datos”.
Ángela nos cuenta que con el proyecto tienen como objetivo principal la sensibilización masiva, puesto que necesitan que haya una masa crítica de gente que sea consciente de lo que está pasando con sus datos, de que sepan el valor que tienen sus datos y de que las empresas se están aprovechando de ellos y de que eso es algo que al final tendrá consecuencias a largo y mediano plazo.

“La normativa de la GDPR no sirve para nada si los ciudadanos no ejercen sus derechos. A Movistar, que una persona individual le diga que tiene derecho a saber que están haciendo con sus datos, le da lo mismo. Ahora, si tiene a cien mil personas detrás, entonces ya tienen un problema”.
Básicamente, en la unión está la fuerza. Mientras más usuarios se unan a la iniciativa del #NewDataDeal, más presión colectiva se puede ejercer. Ellos suman el conocimiento y la experiencia, y tú sumas a los números.
Actualmente no hay equilibrio, las empresas controlan todo este enramado y los ciudadanos ni se enteran, ni saben cómo cambiar esa situación, porque no saben qué derechos tienen ni cómo ejercerlos

Por supuesto, mydatamood también busca un beneficio en todo esto, no un proyecto filantrópico, también es un negocio, porque necesita serlo para poder ser sostenible. En eso han sido muy transparentes: “Lo que nosotros queremos hacer, para que funcione, necesita de esa masa crítica de usuarios, necesitas hacerlo bien y necesitas dinero”.
El plan para hacer rentable mydatamood es el de encontrar un equilibrio entre sensibilizar al público y ofrecer un servicio viable económicamente. Ellos facilitan de forma gratuita una serie de recursos que te ayudan a ejercer tus derechos, pero si quieres ir más allá y llevar acciones legales, puedes disponer de sus servicios pagando.
Si al final quieres poner una reclamación a la Agencia de Protección de Datos, o si quieres que le insistamos a una empresa para que borren algo, habrá otra serie de derechos que quién quiera que le ayudemos a ejercerlos, pues tendría que pagar. Como cualquier plataforma de negocio escalable, vas a pagar mucho menos si lo haces a través de una plataforma que se dedica especialmente a ello y que tiene un sistema automatizado, que si te vas a un despacho de abogados
Por ahora, si te unes a mydatamood como un “mooder”, te regalan 50 de lo que han llamado “mooins”. Con esos mooins puedes reclamar tus datos (10 mooins por solicitud). Con eso puedes empezar, y proximamente ofrecerán más servicios como rectificación de datos erroneos, eliminación de datos, y hasta formas de rentabilizar tus propios datos.
La ventaja aquí es que si no sabes cómo reclamar algo, ni a dónde acudir, ni qué derechos tienes, mydatamood pone todo eso a tu alcance a través de un equipo especializado y prometen hacerlo con una “oferta muy barata, muy tarifa plana”.
En estos momentos solo las empresas se benefician de los datos que recolectan, en mydatamood tienen claro que esos datos tienen valor, especialmente valor ecónomico, y si logran amasar una buena cantidad de usuarios para ejercer suficiente presión utilizando los recursos legales que dominan y que escapan al usuario individual, podrían lograr crear ese nuevo acuerdo en el que se beneficien también los usuarios.
La recolección de datos no va a detenerse pronto o probablemente, nunca. Pero hoy, la balanza está completamente del lado de un bando.
También te recomendamos
–
La noticia Basta de que solo las empresas se beneficien de tus datos, ‘mydatamood’ quiere equilibrar la balanza a favor de los usuarios fue publicada originalmente en Genbeta por Gabriela González .
Dispositivos extraíbles en entornos industriales: amenazas y buenas prácticas
Via https://blog.segu-info.com.ar/2019/04/dispositivos-extraibles-en-entornos.html
Es algo obvio que los dispositivos extraíbles son un medio indispensable para el traspaso de información de forma rápida y sencilla, cargar nuevas configuraciones, actualizar el firmware de un dispositivo, etc. No obstante, si no tenemos una política rigurosa y llevamos a cabo buenas prácticas para su uso, pueden convertirse en una amenaza en vez de ayudar a prevenirlas. Por este motivo, debemos tener claro cuál es el rol de los USB dentro de SCI, sus ventajas mediante un uso correcto y mejorar sus puntos más débiles para evitar riesgos innecesarios.
Utilización de dispositivos USB en SCI y amenazas por un uso inseguro
Los dispositivos USB extraíbles y las unidades de memoria flash, son muy utilizados en el día a día dentro de los Sistemas de Control, por ese motivo tenemos que tener especial cuidado, ya que son uno de los principales vectores de amenaza en el ámbito de la ciberseguridad. El conflicto surge debido a que las redes industriales son bastante complejas y, además, solemos encontrar gran cantidad de dispositivos que no se encuentran conectados a la red por cuestiones de seguridad, por lo que una de las formas más habituales de acceder a ellos es mediante USB.
Estos medios extraíbles son una forma de simplificar este procedimiento, pero a su vez, conlleva el riesgo de introducir algún malware en estos sistemas o la posibilidad de que sea un BadUSB. Por otra parte, tener una gran variedad de dispositivos de campo hace complicado, sino imposible, la gestión a todos desde una misma aplicación, y se requiere en general el uso de USB para tratar con ellos. También se debe hacer hincapié en que la vida útil de los equipos suele ser bastante larga y se combinan sistemas heredados. Por supuesto, la mayor amenaza que tienen los USB es el personal que maneja los dispositivos de control, ya que son ellos los encargados de manipular estas memorias.
Incidentes provocados por dispositivos USB

Los dispositivos USB son uno de los riesgos o amenazas para SCI más grandes desde hace mucho tiempo. Una determinada cantidad del malware detectado en este entorno ha entrado por vía USB, ya que no se hizo uso de buenas prácticas. Algunos de los incidentes provocados, más conocidos, cuyo vector de ataque fue a través de estos dispositivos, son STUXNET y TRITON.
En general la mayoría del malware que se introduce mediante estos dispositivos suelen ser troyanos, aunque no es el único tipo que nos podemos encontrar. Dentro de los troyanos tenemos varios subtipos como “backdoor”, “bots”, “Droppers”, etc. Otros tipos podrían ser “Adware”, “Rootkits” y gusanos. Todos ellos, son malware que infectan los dispositivos e intentan permanecer ocultos al usuario y de esta forma, obtener información para algún proceso o ejecutar código de manera remota.
Por otra parte, estos dispositivos consiguieron desbaratar la medida de seguridad conocida como Air GAP, consistente en aislar la red deseada para protegerla de manera más eficiente de redes que pudieran ser una amenaza. El problema reside al conectar el USB que contiene el malware a la red que tenemos protegida mediante este aislamiento, ya que esta barrera de seguridad queda totalmente inservible. De esta forma, un atacante podría infectar mediante comandos los dispositivos que vea necesarios. Después de esto, solo tendría que sacar la información obtenida de esta red para que el ataque sea totalmente satisfactorio. Por esta razón, es necesario mejorar el uso de dispositivos USB de manera segura.
Uso seguro de USB
La seguridad de los USB debería incluir controles técnicos y normativos, ya que confiar solo en las actualizaciones no será suficiente para prevenir posibles amenazas.
Aunque está muy generalizado pensar que estos dispositivos son peligrosos y que, en gran medida, van acompañados de algún malware, actualmente sin estos dispositivos no podría ser factible la funcionalidad de las plantas. Por esta razón, si se toman precauciones y se hace un buen uso de ellos, representan un complemento muy útil en el entorno industrial.
Además de contar con una política interna para la utilización de dispositivos USB, hay que implantar buenas prácticas que nos ayudarán a minimizar el riesgo de infección en nuestro entorno:
- Usar siempre USB corporativos que estén debidamente protegidos y con las medidas de seguridad adecuadas, almacenándolos en lugares apropiados, e informar al departamento responsable si hubiese algún incidente.
- Controlar los dispositivos externos utilizados dentro de la empresa mediante un inventariado, que incluya un identificador inequívoco para cada uno.
- No usar dispositivos personales para almacenar información referente a la empresa, en la medida de lo posible. Y si fuese necesario su uso, hacerlo teniendo la autorización de un superior o técnico, cumpliendo las políticas internas referentes al mismo, que debería incluir como mínimo un formateo, cifrado, borrado seguro de los datos y el escaneo previo.
- Siempre que sea posible, usar los dispositivos en un entorno de prueba para verificar que no contengan ninguna amenaza.
- Análisis frecuentes de los medios extraíbles mediante antivirus, por prevención.
- Borrado seguro de la información confidencial, asegurándonos de que nadie podrá recuperar esos datos.
- Seguridad de puertos USB inmediata y personalizada para redes industriales, obteniendo una mejora en la seguridad y reduciendo la infección de malware u otras amenazas.
- Actualizaciones de seguridad en curso y continuas para los USB.
- Mejor visibilidad de la utilización de USB y actividad de amenazas mediante el control de riesgos que podemos obtener, si seguimos una buena política de seguridad.
- Formación en el uso correcto de este tipo de dispositivos en las empresas a todos los empleados para que sean conscientes de las posibles amenazas, fomentar así el uso seguro y responsable y evitar los riesgos innecesarios.
- Nunca usar dispositivos de origen desconocidos que se hayan encontrado fuera o dentro de la zona de trabajo.
- Indispensable la utilización de una herramienta, de la cual hablaremos a continuación, que permita la prevención de riesgos para los USB antes de acceder a las instalaciones.
Kioskos, medida de prevención
Las instalaciones industriales requieren un medio seguro para que no haya infección malware mediante USB o medios extraíbles similares.
Los kioscos son dispositivos que se están empezando a desplegar en el ámbito industrial por su eficacia, al asegurar que los dispositivos extraíbles no tengan ninguna amenaza en su interior. Pueden proporcionar una protección más avanzada para verificar el estado de estos dispositivos extraíbles mediante su funcionamiento. Algunas de sus funcionalidades incluyen:
- Contención de amenazas mediante blacklist, análisis simultáneos mediante múltiples motores de antivirus.
- Protección ante BadUSB. Control de dispositivos USB con firmware firmado, bastionado de kioscos, control e inventario de USB, además de control de ordenadores finales.
- Opción para múltiples dispositivos externos, además de USB.
- Análisis de los certificados de los ficheros firmados.
- Opción de un borrado seguro. Se eliminan los datos contenidos en el USB de forma definitiva, sin la posibilidad de poder recuperarlos.
- Control de uso de kioscos. Se autoriza quién puede usarlos para analizar los dispositivos y llevar un registro de ellos.
- Mejoramos la seguridad de la planta donde se instala el kiosco al poder combinar su análisis USB con las actualizaciones basadas en la nube para posibles amenazas.
- Al habilitar diferentes puestos de kioscos, se podrá reducir el riesgo de explotación malware al tener monitorizados y controlados los dispositivos extraíbles en todas las áreas donde sea necesario su despliegue.
- Control físico e inventariado de dispositivos USB, así como impresión de tickets de autorización para los dispositivos analizados.
Conclusiones
Aunque es cierto que los tipos de amenazas provocadas por medios USB han sido más serias de lo que se pensaba inicialmente, es inevitable que siga habiendo exposición a amenazas para los dispositivos vía USB. Sin embargo, con una política correcta y el seguimiento de unas buenas prácticas de uso de estos dispositivos, se podrá reducir la mayoría de los peligros.
Por otro lado, la utilización de kioscos, una herramienta que se está empezando a implementar cada vez más en la industria, gracias al control de amenazas que proporciona, nos dará una mejor eficacia para el trabajo con USB.
Como siempre la formación, concienciación, prevención y la utilización segura de estos son la clave para evitar un incidente de seguridad debido a un mal uso de los dispositivos.
Aunque se haga un buen uso de este medio, lo mejor siempre será combinar varias medidas de seguridad para que la eficiencia sea más alta. Por este motivo, no tenemos que olvidarnos de otras medidas como la monitorización, el control de zonas y conductos o la gestión de parches, ya que un uso adecuado de todos estos conceptos hará que los Sistemas de Control tengan menos riesgos.
Fuente: INCIBE
Como descargar un ISO oficial de Windows 10 antes de la actualización de octubre, en caso de emergencia

Windows 10 recibió un par de actualizaciones acumulativas tanto para la Fall Creators Update, como para la April 2018 Update. Esas son las dos últimas versiones oficiales del sistema de Microsoft, y es importante instalarlas para deja tu sistema a punto ya sea que quieras o no quieras actualizar a la nueva versión de octubre.
Este 2 de octubre tenemos evento de Surface y los rumores apuntan a que ese mismo día se lanzará la próxima gran actualización de Windows 10. Teniendo en cuenta que los problemas post actualización no son precisamente raros con Windows, es buena idea descargar una imagen oficial de la versión estable actual, en caso de emergencia y mientras puedas.
Si bien, Windows 10 te ofrece la opción de regresar a una compilación anterior en caso de que algo vaya mal con la actualización, a veces hay quien tiene la mala suerte que ni esa opción le funciona. De ahí que tener una imagen de la última versión que te iba bien, no sea mala idea. Especialmente si quieres una instalación completamente limpia.

Descargar un ISO de Windows 10 1803
Windows 10 1803 es la actualización de abril 2018, la que esperamos para octubre es la versión 1809. En estos momentos, mientras aún tenemos la de abril como la versión actual, es posible descargar el ISO oficial de Windows 10 usando la misma herramienta de Microsoft que se nos ofrece para actualizar.


Lo primero que necesitas hacer es ir a la web oficial de Microsoft para descargar Windows 10. Debes hacerlo desde un ordenador con Windows, y debes tener al menos unos 8 GB de espacio disponibles para guardar la imagen.
Haz click en Descargar ahora la herramienta y elige un sitio para guardar el programa MediaCreationTool1803.exe. Ejecuta la herramienta que acabas de descargar haciendo doble click sobre el archivo.


Espera que el programa termine de hacer preparativos y acepta los términos para poder continuar. Cuando se presente la pregunta “¿Qué deseas hacer?”, selecciona Crear medios de instalación y presiona “siguiente”.
Elige idioma, edición y arquitectura (usualmente basta con dejar lo que viene por defecto) y presiona “siguiente”.


En la siguiente pantalla tienes la opción de elegir una unidad USB y crear de una vez tu disco de arranque, o elegir “Archivo ISO”. Ese archivo ISO lo puedes guardar donde quieras y montar tu imagen luego desde cualquier sistema.


Selecciona “Archivo ISO” y presiona “siguiente”. Elige la carpeta donde lo quieres guardar y listo. Solo tienes que esperar que finalice la descarga. Ignora todo lo que tiene que ver con el DVD, ese ISO lo puedes montar perfectamente en un USB en el futuro.


Existen herramientas aparte de la de Windows para crear discos de arranque USBque puedes usar en cualquier otro sistema operativo. Además, recuerda la razón por la que estamos guardando este ISO, en caso de emergencia, no lo guardes en el ordenador que vas a actualizar, al menos no en la misma partición que el Windows 10 que vas a actualizar.
Es importante que si quieres esta versión la descargues antes de la primera semana de octubre, salvo que la próxima actualización se retrase, el ISO que se baja con esta herramienta será cambiado por el de Windows 10 1809 tan pronto como se libere la actualización.
Solve digital transformation challenges using Oracle Cloud Oracle Technology Network Blog (aka TechBlog)

Digital transformation is an omnipresent topic today, providing a lot of challenges as well as chances. Due to that, customers are asking about how to deal with those challenges and how to leverage from the provided chances. Frequently asked questions in this area are:
- How can we modernize existing applications?
- What are the key elements for a future-proven strategy IT system architecture?
- How can the flexibility as well as the agility of the IT system landscape be ensured?
But from our experience there’s no common answer for these questions, since every customer has individual requirements and businesses, but it is necessary to find pragmatic solutions, which leverage from existing best Practices – it is not necessary to completely re-invent the wheel.
With our new poster „Four Pillars of Digitalization based on Oracle Cloud“ (Download it here) , we try to deliver a set of harmonized reference models which we evolved based on our practical experience, while conceiving modern, future-oriented solutions in the area of modern application designs, integrative architectures, modern infrastructure solutions and analytical architectures. The guiding principle, which is the basis for our architectural thoughts is: Design for Change. If you want to learn more, you can refer to our corresponding Ebook (find the Ebook here, only available in German at the moment).
Usually the technological base for modern application architectures today is based on Cloud services, where the offerings of different vendors are constantly growing. Here it is important to know which Cloud services are the right ones to implement a specific use case. Our poster „Four Pillars of Digitalization based on Oracle Cloud“ shows the respective Cloud services of our strategic partner Oracle, which can be used to address specific challenges in the area of digitalization. Get the poster here.
For regular information become a member in the Developer Partner Communityplease visit: http://www.oracle.com/partners/goto/wls-emea ( OPN account required). If you need support with your account please contact the Oracle Partner Business Center.
Blog
Twitter
LinkedIn
Forum
Wiki
Technorati Tags: PaaS,Cloud,Middleware Update,WebLogic, WebLogic Community,Oracle,OPN,Jürgen Kress
ECM by the Decades: Upcoming Shows
Between Sound and Space: ECM Records and Beyond
Thank you all who tuned in for my first of four “ECM by the Decades” radio shows on WKCR. Host Andrew Castillo and I will continue our saga through the label on March 12, March 26, and April 9. For those of you who joined us live during the first show, you will be pleased to know that the station’s fundraising efforts for this cycle are complete and that our show will no longer be interrupted. I am grateful for your patience the first time around. We’ll be on the air next Monday from 6-9pm EST, streamling live on the station website here. A podcast version will also appear on this website soon thereafter.
Cómo liberar espacio en Windows 10 moviendo tus apps a un disco externo

Hay muchas formas de jugar con Windows 10 para liberar espacio en disco si se nos empieza a acabar. Podemos por ejemplo, borrar los archivos temporales. También existen ciertas carpetas que podemos eliminar para abrir algo de hueco en nuestro disco.
Ahora, si tienes uno de esos ordenadores que traen una cantidad de espacio bastante limitada, vas a querer ahorrar hasta en lo más insignificante, como una app de menos de 100 MB. Por suerte Windows 10 no solo te deja mover apps a un almacenemiento externo, sino que te permite establecer otro disco como la ubicación por defecto para instalar tus aplicaciones.
Puedes usar un pendrive, una tarjeta SD, o un disco duro externo. No importa el medio realmente, lo único que importa es que lo mantengas conectado al ordenador y lo formatees como NTFS.
Primero conecta la unidad de almacenamiento a tu ordenador, luego navega a Este Equipo y selecciona el dispositivo que conectaste de la lista. Haz click derecho sobre la unidad y luego en Formatear… (ten en cuenta que esto borra todos los datos de la unidad).

En Sistema de archivos selecciona NTFS en el menú desplegable. Si quieres puedes darle un nombre a la unidad en el cuadro Etiqueta del volumen. Luego presiona Iniciar y espera que termine. Estás listo para usar la unidad.
Mover aplicaciones de Windows 10 a otra unidad
No todas las aplicaciones pueden ser movidas a otra unidad, tendrás que revisar una por una las que quieras mover. Para ello abre el menú de Configuración presionando la tecla de Windows + I y selecciona Aplicaciones.
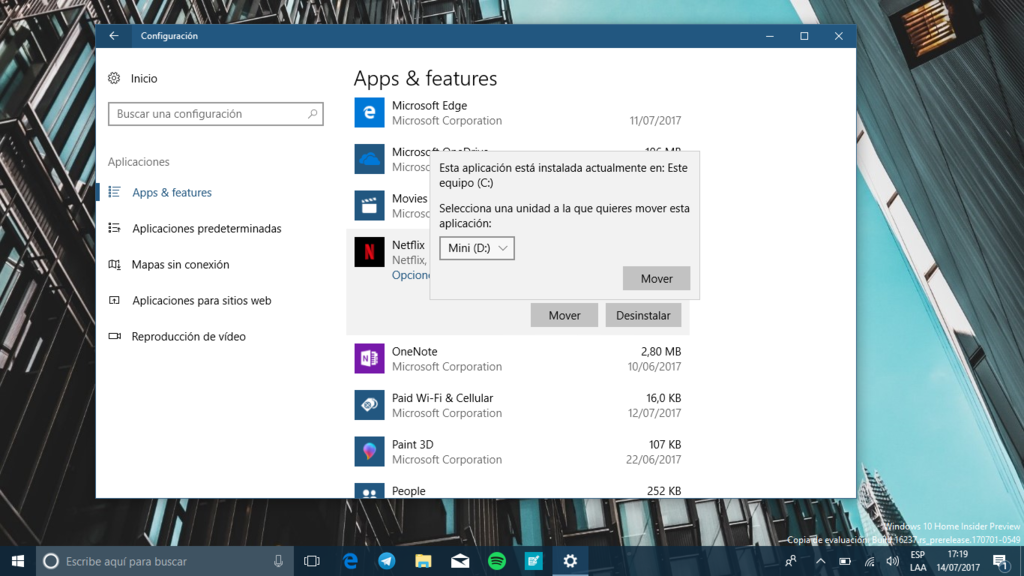
Navega por la lista de aplicaciones y selecciona la que te interese mover. Si el botón funciona, simplemente haz click en él y luego presiona aplicar para mover la aplicación a la nueva unidad. Repite con las que quieras, una a una, lamentablemente no se puede hacer por lote.
Si quieres que todas las apps que instales en el futuro se guarden en el dispositivo de almacenamiento externo, también puedes hacerlo.

Abre el menú de configuración nuevamente y ve a Sistema. En el menú de la derecha selecciona Almacenamiento. Ahí busca la opción Cambiar la ubicación de almacenamiento del contenido nuevo y haz click sobre ella.

Ahora puedes elegir otra unidad para guardar las aplicaciones nuevas. También puedes hacer lo mismo con otro tipo de contenido, documentos, música, fotos, vídeos, etc.
En Genbeta | Nueve utilidades (y algunos consejos) para liberar espacio en tu disco duro en Windows
También te recomendamos
Cómo crear una máquina virtual con Windows 10 para probar las beta del programa Insider
Cómo aumentar el nivel de protección antivirus de Windows Defender
Cómo se planifica una cocina que se adapta a ti
–
La noticia Cómo liberar espacio en Windows 10 moviendo tus apps a un disco externo fue publicada originalmente en Genbeta por Gabriela González .
Cómo aumentar el nivel de protección antivirus de Windows Defender
Genbeta

Windows Defender es un antivirus bastante bueno, es una herramienta sólida y que al venir ya integrada en Windows tiene un impacto muy bajo en el rendimiento del sistema en comparación son soluciones de terceros. No decimos que sea perfecto, pero como solución de seguridad básica, gratuita e integrada perfectamente con Windows 10, queda muy bien parada.
Con la llegada de la Creators Update Microsoft le dio un lavado de cara a su herramienta antivirus y lo ha convertido en un Centro de seguridad completo con varias opciones para protegerte de diferentes amenazas o solucionar problemas en un par de clicks.
Una de las características más importantes de Windows Defender es la protección basada en la nube, ya que esta dice proporcionar mayor protección y de forma más rápida al tener acceso a los datos más recientes. Y con la Creators Update también puedes elegir manualmente el nivel de protección basada en la nube y aumentarlo, solo que el proceso es algo más complicado que marcar una casilla en el Centro de seguridad.
Requisitos
Es importante que sepas algunas cosas antes de comenzar. La primera es que para poder aumentar el nivel de protección de Windows Defender necesitarás editar el registro de Windows y tendrás que unirte al programa MAPS de Microsoft.
Al unirte al programa MAPS de Microsoft aceptarás que la empresa recopile varias piezas de información sobre las amenazas detectadas en tu equipo, y en algún momento quizás se recopile tu información personal, aunque Microsoft promete que no la usará para identificarte o contactarte.
Antes de proceder a editar el registro de Windows es importante que tengas cuidado en hacerlo de forma correcta o podrías dañar tu sistema de forma permanente. Te recomendamos crear un punto de restauración al que puedas volver en caso de que algo vaya mal.
Cambiar el nivel de protección en la nube de Windows Defender
Presiona la tecla de Windows + R y escribe “regedit” (sin las comillas) y presiona Enter. Esto abrirá el Editor del Registro de Windows.
Navega hasta la siguiente ruta:
Selecciona Nuevo, luego elige Clave, nombra la nueva carpeta Spynet y presiona Enter:

Ahora haz click derecho en Spynet, elige Nuevo, luego selecciona Valor de DWORD (32 bits) y cambia el nombre a SpynetReporting. Presiona Enter. Luego haz doble click en SpynetReporting y cambia la Información del valor de 0 a 2. Presiona Aceptar.

Con esto te habrás unido al programa de Microsoft MAPS. Ahora es momento de cambiar el nivel de protección antivirus basado en la nube.
Vuelve a abrir el editor del registro, navega hasta la misma ruta:
Haz click derecho sobre la carpeta Windows Defender, selecciona Nuevo y luego haz click en Clave. Nombra la nueva carpeta como MpEngine y presiona Enter.

Ahora haz click derecho sobre MpEngine, selecciona Nuevo y luego elige Valor de DWORD (32 bits). Cambia el nombre de la clave a MpCloudBlockLevel y presiona Enter. Haz doble click sobre MpCloudBlockLevel y cambia el número en información del valor de 0 a 2 y presiona Aceptar.
Una vez completados estos pasos, Windows Defender usará un nivel de protección más elevado a la hora de escanear y detectar archivos sospechosos en tu ordenador. Esperemos que estas opciones aparezcan tarde o temprano directamente en el Centro de seguridad para no tener que recurrir a editar el registro si queremos disfrutar de ellas.
Gerrymandering game shows you hot it works
Flowing Data
 Gerrymandering is the practice of manipulating boundaries in such a way that favors a political party. If you slice and group in various ways, you can end up with different election results.
How many different ways can you draw boundaries though? And can results really change that much, depending on you draw the boundaries? District, by Christopher Walker, is a puzzle game that shows you how it works. The goal: Group circles in such a way that favors your color.
Tags: game, gerrymandering, government
Keylogger Found in Audio Driver of HP Laptops, Says Report
Read more of this story at Slashdot.
Byte Podcast 549 – Reporte de Seguridad 2017 de ESET
Hardening Windows 10 with zero-day exploit mitigations
A key takeaway from the detonation of zero-day exploits is that each instance represents a valuable opportunity to assess how resilient a platform can be—how mitigation techniques and additional defensive layers can keep cyberattacks at bay while vulnerabilities are being fixed and patches are being deployed. Because it takes time to hunt for vulnerabilities and it is virtually impossible to find all of them, such security enhancements can be critical in preventing attacks based on zero-day exploits.
In this blog, we look at two recent kernel-level zero-day exploits used by multiple activity groups. These kernel-level exploits, based on CVE-2016-7255 and CVE-2016-7256 vulnerabilities, both result in elevation of privileges. Microsoft has promptly fixed the mentioned vulnerabilities in November 2016. However, we are testing the exploits against mitigation techniques delivered in August 2016 with Windows 10 Anniversary Update, hoping to see how these techniques might fare against future zero-day exploits with similar characteristics.
| CVE | Microsoft Update | Exploit Type | Mitigation in Anniversary Update |
| CVE-2016-7255 | MS16-135 (Nov, 2016) | Win32k Elevation of Privilege Exploit | Strong validation of tagWND structure |
| CVE-2016-7256 | MS16-132 (Nov, 2016) | Open Type Font Exploit | Isolated Font Parsing (AppContainer) Stronger validation in font parsing |
CVE-2016-7255 exploit: Win32k elevation of privilege
In October 2016, the STRONTIUM attack group launched a spear-phishing campaign targeting a small number of think tanks and nongovernmental organizations in the United States. The campaign, also discussed in the previously mentioned blog post, involved the use of the exploit for CVE-2016-7255 in tandem with an exploit for the Adobe Flash Player vulnerability CVE-2016-7855.
The attack group used the Flash exploit to take advantage of a use-after-free vulnerability and access targeted computers. They then leveraged the type-confusion vulnerability in win32k.sys (CVE-2016-7255) to gain elevated privileges.
Abusing the tagWND.strName kernel structure
In this section, we’ll go through the internals of the specific exploit for CVE-2016-7255 crafted by the attacker. We will show how mitigation techniques provided customers with preemptive protection from the exploit, even before the release of the specific update fixing the vulnerability.

Figure 1. Exploit and shellcode phases of this attack
Modern exploits often rely on read-write (RW) primitives to achieve code execution or gain additional privileges. For this exploit, attackers acquire RW primitives by corrupting tagWND.strName kernel structure. This exploit method is a trend discussed in security conferences and visible to those who investigated actual attacks. For example, we detailed similar findings in a presentation about the Duqu 2.0 exploit at Virus Bulletin 2015.
By reverse engineering its code, we found that the Win32k exploit used by STRONTIUM in October 2016 reused the exact same method. The exploit, after the initial Win32k vulnerability, corrupts tagWND.strName structure and uses SetWindowTextW to write arbitrary content anywhere in kernel memory.

Figure 2. SetWindowTextW as a write primitive
The exploit abuses this API call to overwrite data of current processes and copy token privileges of the SYSTEM. If successful, the exploit enables the victim process—iexplore.exe, in this example—to execute with elevated privileges.
Figure 3. Internet Explorer with SYSTEM privileges
Mitigating tagWND exploits with stronger validation
To mitigate the Win32k exploit and similar exploits, the Windows Offensive Security Research Team (OSR) introduced techniques in the Windows 10 Anniversary Update that prevent abusive use of tagWND.strName. This mitigation performs additional checks for the base and length fields, making sure that they are in the expected virtual address ranges and are not usable for RW primitives. In our tests on Anniversary Update, exploits using this method to create an RW primitive in the kernel are ineffective. These exploits instead cause exceptions and subsequent blue screen errors.

Figure 4. Windows 10 Anniversary Update mitigation on a common kernel write primitive
With the upcoming Windows 10 Creators Update, Windows Defender ATPintroduces numerous forms of generic kernel exploit detection for deeper visibility into targeted attacks leveraging zero-day exploits. Technical details about the enhanced sensor will be shared in a forthcoming blog post.
CVE-2016-7256 exploit: Open type font elevation of privilege
As early as June 2016, unidentified actors began to use an implant detected as “Henkray” in low-volume attacks primarily focused on targets in South Korea. Later, in November 2016, these attackers were detected exploiting a flaw in the Windows font library (CVE-2016-7256) to elevate privileges and install the Henkray backdoor on targeted computers with older versions of Windows.
The font samples found on affected computers were specifically manipulated with hardcoded addresses and data to reflect actual kernel memory layouts. This indicates the likelihood that a secondary tool dynamically generated the exploit code at the time of infiltration.

Figure 5. Auto-generation of font file with exploit
This secondary executable or script tool, which has not been recovered, appears to prepare and drop the font exploit, calculating and preparing the hardcoded offsets needed to exploit the kernel API and the kernel structures on the targeted system. Through deep forensic inspection of the binary data found in samples, we extracted all the hardcoded offsets and ascertained the kernel version targeted by this exploit: Windows 8 64-bit.
Function table corruption for initial code execution
The font exploit uses fa_Callbacks to corrupt the function table and achieve initial code execution. The callback is called from the CFF parsing function. The following snippet shows a corrupted ftell pointer to a nt!qsort+0x39 location in kernel code.

Figure 6. fa_Callbacks table corruption
The following snippet shows the code that calls the corrupt function pointer leading to a kernel ROP chain.
Figure 7. fa_Callbacks.ftell function call code
When the corrupted function is called, the control jumps to the first ROP gadget at nt!qsort+0x39, which adjusts stack pointer and initializes some register values from stack values.

Figure 8. First ROP gadget
After the first gadget, the stack points to a kernel ROP chain which calls to ExAllocatePoolWithTag call to reserve shellcode memory. Another ROP gadget will copy the first 8 bytes of the stage 1 shellcode to the allocated memory.

Figure 9. Copying the stage 1 shellcode
Shellcode and privilege escalation
The stage 1 shellcode is very small. Its main function is to copy the main body of the shellcode to newly allocated memory and run them with a JMP RAX control transfer.

Figure 10. Stage 1 shellcode
The main shellcode runs after the copy instructions. The main shellcode—also a small piece of code—performs a well-known token-stealing technique. It then copies the token pointer from a SYSTEM process to the target process, achieving privilege escalation. Both the SYSTEM process and target process PIDs, as well as certain offsets for the kernel APIs needed by the shellcode, are hardcoded in the font sample.

Figure 11. Token replacement technique
Mitigating font exploits with AppContainer
When opening the malicious font sample on Windows 10 Anniversary Update, font parsing happens completely in AppContainer instead of the kernel. AppContainer provides an isolated sandbox that effectively prevents font exploits (among other types of exploits) from gaining escalated privileges. The isolated sandbox considerably reduces font parsing as an attack surface.

Figure 12. AppContainer protects against untrusted fonts in Windows 10 Anniversary Update
Windows 10 Anniversary Update also includes additional validation for font file parsing. In our tests, the specific exploit code for CVE-2016-7256 simply fails these checks and is unable to reach vulnerable code.

Figure 13. Windows 10 font viewer error
Conclusion: Fighting the good fight with exploit mitigation and layered detection
While fixing a single-point vulnerability helps neutralize a specific bug, Microsoft security teams continue to look into opportunities to introduce more and more mitigation techniques. Such mitigation techniques can break exploit methods, providing a medium-term tactical benefit, or close entire classes of vulnerabilities for long-term strategic impact.
In this article, we looked into recent attack campaigns involving two zero-day kernel exploits. We saw how exploit mitigation techniques in Windows 10 Anniversary Update, which was released months before these zero-day attacks, managed to neutralize not only the specific exploits but also their exploit methods. As a result, these mitigation techniques are significantly reducing attack surfaces that would have been available to future zero-day exploits.
By delivering these mitigation techniques, we are increasing the cost of exploit development, forcing attackers to find ways around new defense layers. Even the simple tactical mitigation against popular RW primitives forces the exploit authors to spend more time and resources in finding new attack routes. By moving font parsing code to an isolated container, we significantly reduce the likelihood that font bugs are used as vectors for privilege escalation.
In addition to the techniques mentioned in this article, Windows 10 Anniversary Update introduced many other mitigation techniques in core Windows components and the Microsoft Edge browser, helping protect customers from entire classes of exploits for very recent and even undisclosed vulnerabilities.
For effective post-breach detection, including cover for the multiple stages of attacks described in this blog post, sign up for Window Defender ATP. The service leverages built-in sensors to raise alerts for exploits and other attack activity, providing corresponding threat intelligence. Customers interested in the Windows Defender ATP post-breach detection solution can find more information here.
Microsoft would like to thank KrCERT for their collaboration in protecting customers and for providing the sample for CVE-2016-7256.
Matt Oh and Elia Florio, Windows Defender ATP Research Team
Updates:
Jan 18, 2017 – Corrected the spelling of Henkray backdoor.
Should Banks Let Ancient Programming Language COBOL Die?
Read more of this story at Slashdot.
How Cybercrooks Put the Beatdown on My Beats
Krebs on Security
Last month Yours Truly got snookered by a too-good-to-be-true online scam in which some dirtball hijacked an Amazon merchant’s account and used it to pimp steeply discounted electronics that he never intended to sell. Amazon refunded my money, and the legitimate seller never did figure out how his account was hacked. But such attacks are becoming more prevalent of late as crooks increasingly turn to online crimeware services that make it a cakewalk to cash out stolen passwords.

The item at Amazon that drew me to this should-have-known-better bargain was a Sonoswireless speaker that is very pricey and as a consequence has hung on my wish list for quite some time. Then I noticed an established seller with great feedback on Amazon was advertising a “new” model of the same speaker for 32 percent off. So on March 4, I purchased it straight away — paying for it with my credit card via Amazon’s one-click checkout.
A day later I received a nice notice from the seller stating that the item had shipped. Even Amazon’s site seemed to be fooled because for several days Amazon’s package tracking system updated its progress slider bar steadily from left to right.
Suddenly the package seemed to stall, as did any updates about where it was or when it might arrive. This went on for almost a week. On March 10, I received an email from the legitimate owner of the seller’s account stating that his account had been hacked.
Identifying myself as a reporter, I asked the seller to tell me what he knew about how it all went down. He agreed to talk if I left his name out of it.
“Our seller’s account email address was changed,” he wrote. “One night everything was fine and the next morning our seller account had a email address not associated with us. We could not access our account for a week. Fake electronic products were added to our storefront.”
He couldn’t quite explain the fake tracking number claim, but nevertheless the tactic does seem to be part of an overall effort to delay suspicion on the part of the buyer while the crook seeks to maximize the number of scam sales in a short period of time.
“The hacker then indicated they were shipped with fake tracking numbers on both the fake products they added and the products we actually sell,” the seller wrote. “They were only looking to get funds through Amazon. We are working with Amazon to refund all money that were spent buying these false products.”
As these things go, the entire ordeal wasn’t awful — aside maybe from the six days spent in great anticipation of audiophilic nirvana (alas, after my refund I thought better of the purchase and put the item back on my wish list.) But apparently I was in plenty of good (or bad?) company.
The Wall Street Journal notes that in recent weeks “attackers have changed the bank-deposit information on Amazon accounts of active sellers to steal tens of thousands of dollars from each, according to several sellers and advisers. Attackers also have hacked into the Amazon accounts of sellers who haven’t used them recently to post nonexistent merchandise for sale at steep discounts in an attempt to pocket the cash.”
Perhaps fraudsters are becoming more brazen of late with hacked Amazon accounts, but the same scams mentioned above happen every day on plenty of other large merchandising sites. The sad reality is that hacked Amazon seller accounts have been available for years at underground shops for about half the price of a coffee at Starbucks.
The majority of this commerce is made possible by one or two large account credential vendors in the cybercrime underground, and these vendors have been collecting, vetting and reselling hacked account credentials at major e-commerce sites for years.
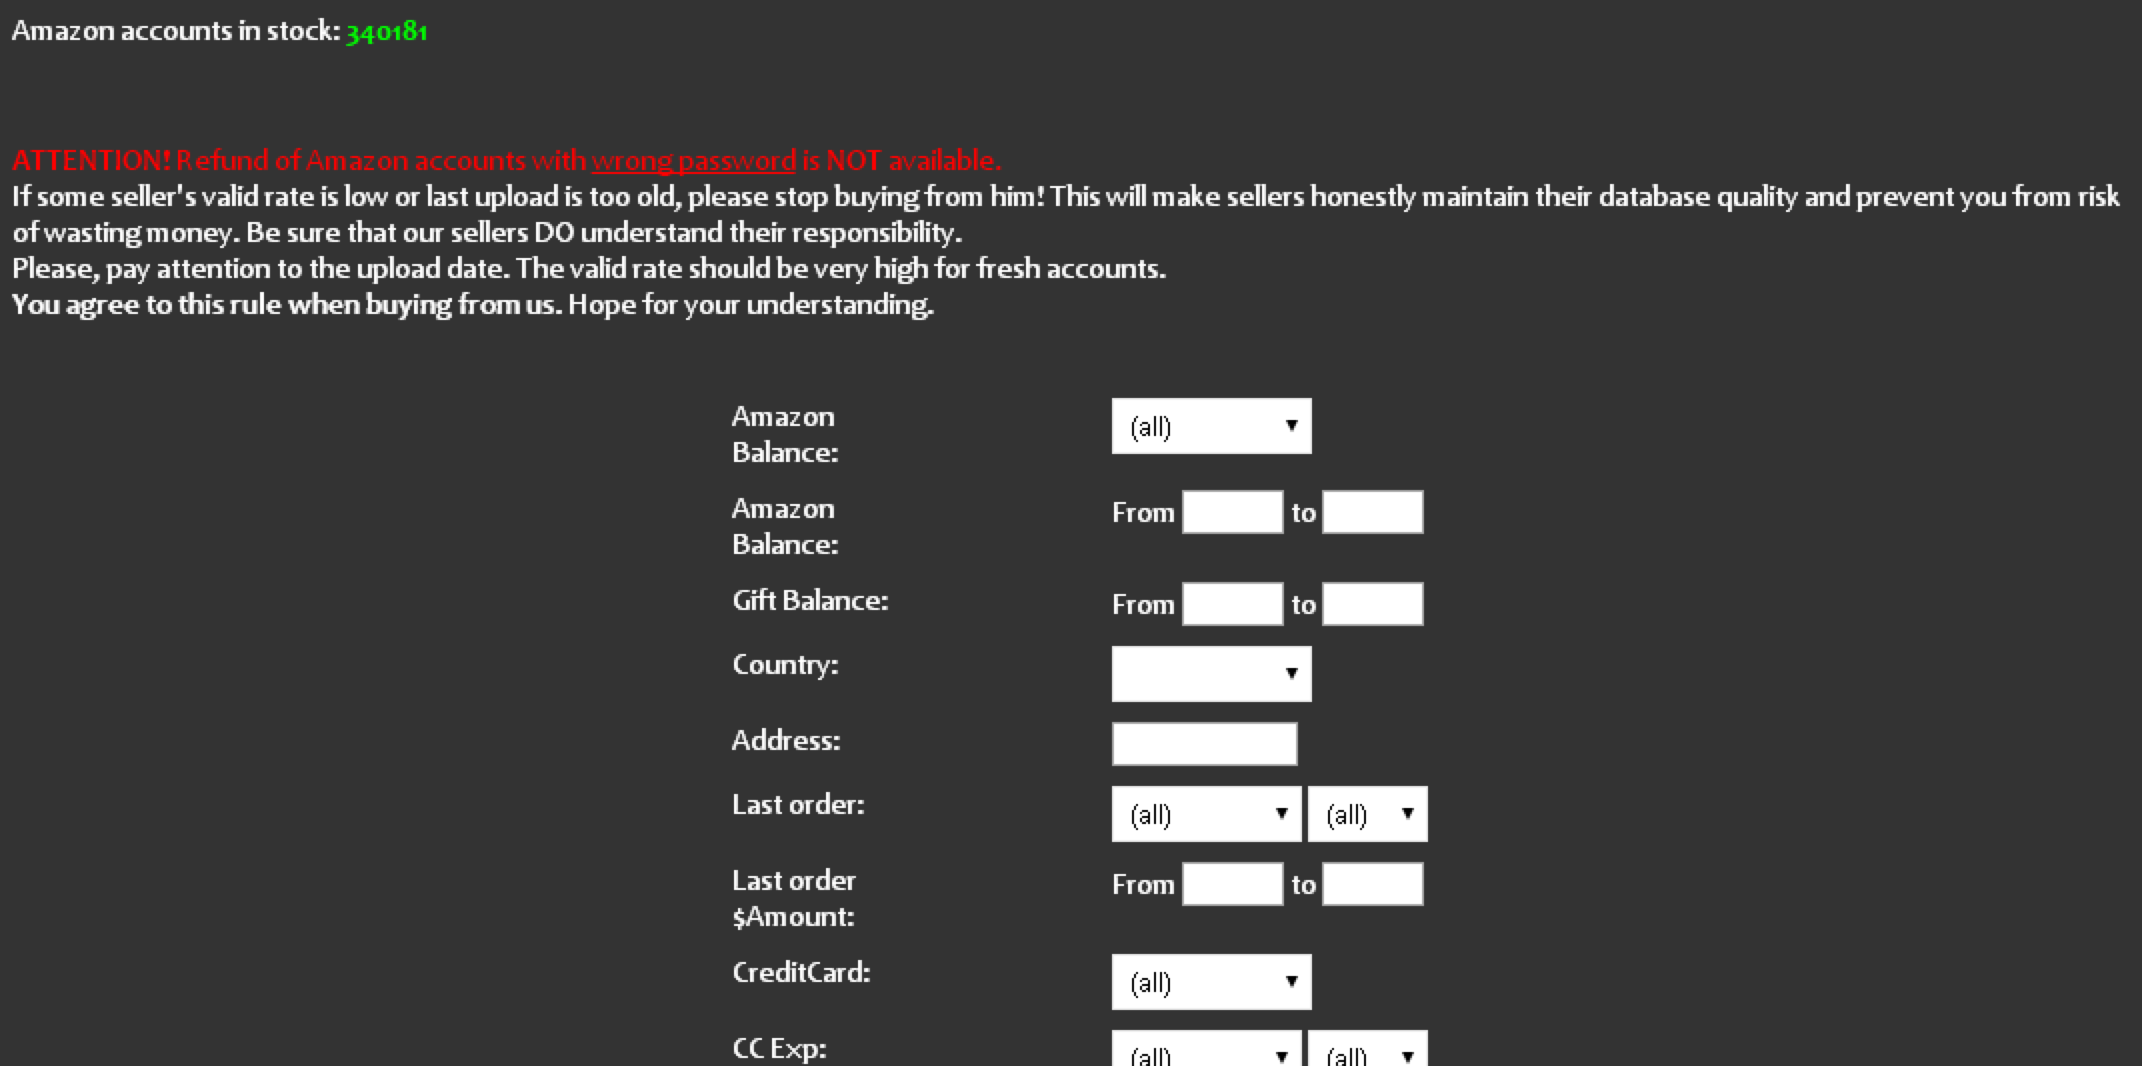
I have no idea where the thieves got the credentials for the guy whose account was used to fake sell the Sonos speaker. But it’s likely to have been from a site like SLILPP, a crime shop which specializes in selling hacked Amazon accounts. Currently, the site advertises more than 340,000 Amazon account usernames and passwords for sale.
The price is about USD $2.50 per credential pair. Buyer scan select accounts by balance, country, associated credit/debit card type, card expiration date and last order date. Account credentials that also include the password to the victim’s associated email inbox can double the price.
If memory serves correctly, SLILPP started off years ago mainly as a PayPal and eBay accounts seller (hence the “PP”). “Slil” is transliterated Russian for “слил,” which in this context may mean “leaked,” as in password data that has leaked from other now public breaches. SLILPP has vastly expanded his store in the years since: It currently advertises more than 7.1 million credentials for sale from hundreds of popular bank and e-commerce sites.
The site’s proprietor has been at this game so long he probably deserves a story of his own soon, but for now I’ll say only that he seems to do a brisk business buying up credentials being gathered by credential-testing crime crews — cyber thieves who spend a great deal of time harvesting and enriching credentials stolen and/or leaked from major data breaches at social networking and e-commerce providers in recent years.

Fraudsters can take a list of credentials stolen from, say, the Myspace.com breach (in which some 427 million credentials were posted online) and see how many of those email address and password pairs from the MySpace accounts also work at hundreds of other bank and e-commerce sites.
Password thieves often then turn to crimeware-as-a-service tools like Sentry MBA, which can vastly simplify the process of checking a list of account credentials at multiple sites. To make blocking their password-checking activities more challenging for retailers and banks to identify and block, these thieves often try to route the Internet traffic from their password-guessing tools through legions of open Web proxies, hacked PCs or even stolen/carded cloud computing instances.
PASSWORD RE-USE: THE ENGINE OF ALL ONLINE FRAUD
In response, many major retailers are being forced to alert customers when they see known account credential testing activity that results in a successful login (thus suggesting the user’s account credentials were replicated and compromised elsewhere). However, from the customer’s perspective, this is tantamount to the e-commerce provider experiencing a breach even though the user’s penchant for recycling their password across multiple sites is invariably the culprit.
There are a multitude of useful security lessons here, some of which bear repeating because their lack of general observance is the cause of most password woes today (aside from the fact that so many places still rely on passwords and stupid things like “secret questions” in the first place). First and foremost: Do not re-use the same password across multiple sites. Secondly, but equally important: Never re-use your email password anywhere else.
Also, with a few exceptions, password length is generally more important than password complexity, and complex passwords are difficult to remember anyway. I prefer to think in terms of “pass phrases,” which are more like sentences or verses that are easy to remember.
If you have difficult recalling even unique passphrases, a password manager can help you pick and remember strong, unique passwords for each site you interact with, requiring only one strong master password to unlock any of them. Oh, and if the online account in question allows 2-factor authentication, be sure to take advantage of that.
I hope it’s clear that Amazon is just one of the many platforms where fraudsters lurk. SLILPP currently is selling stolen credentials for nearly 500 other banks and e-commerce sites. The full list of merchants targeted by this particularly bustling fraud shop is here (.txt file).
As for the “buyer beware” aspect of this tale, in retrospect there were several warning signs that I either ignored or neglected to assign much weight. For starters, the deal that snookered me was for a luxury product on sale for 32 percent off without much explanation as to why the apparently otherwise pristine item was so steeply discounted.
Also, while the seller had a stellar history of selling products on Amazon for many years (with overwhelmingly positive feedback on virtually all of his transactions) he did not have a history of selling the type of product that thieves tried to sell through his account. The old adage “If something seems too good to be true, it probably is,” ages really well in cyberspace.
Undo Understood
Oracle Scratchpad
It’s hard to understand all the ramifications of Oracle’s undo handling, and it’s not hard to find cases where the resulting effects are very confusing. In a recent post on the OTN database forum resulted in one response insisting that the OP was obviously updating a table with frequent commits from one session while querying it from another thereby generating a large number of undo reads in the querying session.
It’s a possible cause of the symptoms that had been described – although not the only possible cause, especially since the symptoms hadn’t been described completely. It’s actually possible to see this type of activity when there are no updates and no outstanding commits taking place at all on the target table. Unfortunately it’s quite hard to demonstrate this with a quick, simple, script in recent versions of Oracle unless you do some insanely stupid things to make the problem appear – but I know how to do “insanely stupid” in Oracle, so here we go; first some data creation:
rem
rem     Script:         undo_rec_apply_2.sql
rem     Author:         Jonathan Lewis
rem     Dated:          March 2017
rem

create table t2(v1 varchar2(100));
insert into t2 values(rpad('x',100));
commit;

create table t1
nologging
pctfree 99 pctused 1
as
with generator as (
        select
                rownum id
        from dual
        connect by
                level <= 1e4
)
select
        cast(rownum as number(8,0))                     id,
        cast(lpad(rownum,10,'0') as varchar2(10))       v1,
        cast(lpad('x',100,'x') as varchar2(100))        padding
from
        generator       v1,
        generator       v2
where
        rownum <= 8e4 -- > comment to bypass WordPress formatting issue
;

alter table t1 add constraint t1_pk primary key(id)
;

begin
        dbms_stats.gather_table_stats(
                ownname          => user,
                tabname          =>'T1',
                method_opt       => 'for all columns size 1'
        );
end;
/
The t2 table is there as a target for a large of updates from a session other than the one demonstrating the problem. The t1 table has been defined and populated in a way that puts one row into each of 80,000 blocks (though, with ASSM and my specific tablespace definition of uniform 1MB extents, the total space is about 80,400 blocks). I’ve got a primary key declaration that allows me to pick single rows/blocks from the table if I want to.
At this point I’m going to do a lot of updates to the main table using a very inefficient strategy to emulate the type of thing that can happen on a very large table with lots of random updates and many indexes to maintain:
begin
        for i in 1..800 loop
                update t1 set v1 = upper(v1) where id = 100 * i;
                execute immediate 'alter system switch logfile';
                execute immediate 'alter system flush buffer_cache';
                commit;
                dbms_lock.sleep(0.01);
        end loop;
end;
/

set transaction read only;
I’m updating every 100th row/block in the table with single row commits, but before each commit I’m switching log files and flushing the buffer cache.
This is NOT an experiment to try on a production system, or even a development system if there are lots of busy developers or testers around – and if you’re running your dev/test in archivelog mode (which, for some of your systems you should be) you’re going to end up with a lot of archived redo logs. I have to do this switch to ensure that the updated blocks are unpinned so that they will be written to disc and flushed from the cache by the flush buffer cache. (This extreme approach would not have been necessary in earlier versions of Oracle, but the clever developers at Oracle Corp. keep adding “damage limitation” touches to the code that I have to work around to create small tests.) Because the block has been flushed from memory before the commit the session will record a “commit cleanout failures: block lost” on each commit. By the time this loop has run to completion there will be 800 blocks from the table on disc needing a “delayed block cleanout”.
Despite the extreme brute force I use in this loop, there is a further very important detail that has to be set before this test will work (at least in 11.2.0.4, which is what I’ve used in my test runs). I had to start the database with the hidden parameter _db_cache_pre_warm set to false. If I don’t have the database started with this feature disabled Oracle would notice that the buffer cache had a lot of empty space and would “pre-warm” the cache by loading a few thousand blocks from t1 as I updated one row – with the side effect that the update from the previous cycle of the loop would be cleaned out on the current cycle of the loop. If you do run this experiment, remember to reset the parameter and restart the instance when you’ve finished.
I’ve finished this chunk of code with a call to “set transaction read only” – this emulates the start of a long-running query: it captures a point in time (through the current SCN) and any queries that run in the session from now on have to be read-consistent with that point in time. After doing this I need to use a second session to do a bit of hard work – in my case the following:
execute snap_rollstats.start_snap

begin
        for i in 1..10000 loop
                update t2 set v1 = upper(v1);
                update t2 set v1 = lower(v1);
                commit;
        end loop;
end;
/

execute snap_rollstats.end_snap
The calls to the snap_rollstats package simply read v$rollstat and give me a report of the changes in the undo segment statistics over the period of the loop. I’ve executed 10,000 transactions in the interval, which was sufficient on my system to use each undo segment header at least 1,000 times and (since there are 34 transaction table slots in each undo segment header) overwrite each transaction table slot about 30 times. You can infer from these comments that I have only 10 undo segments active at the time, your system may have many more (check the number of rows in v$rollstat) so you may want to scale up that 10,000 loop count accordingly.
At this point, then, the only thing I’ve done since the start of my “long running query” is to update another table from another session. What happens when I do a simple count() from t1 that requires a full tablescan ?
alter system flush buffer_cache;

execute snap_filestat.start_snap
execute snap_my_stats.start_snap

select count(v1) from t1;

execute snap_my_stats.end_snap
execute snap_filestat.end_snap
I’ve flushed the buffer cache to get rid of any buffered undo blocks – again an unreasonable thing to do in production but a valid way of emulating the aging out of undo blocks that would take place in a production system – and surrounded my count() with a couple of packaged call to report the session stats and file I/O stats due to my query. (If you’re sharing your database then the file I/O stats will be affected by the activity of other users, of course, but in my case I had a private database.)
Here are the file stats:
--------------
Datafile Stats
--------------
file#       Reads      Blocks    Avg Size   Avg Csecs     S_Reads   Avg Csecs     M_Reads   Avg Csecs    Max      Writes      Blocks   Avg Csecs    Max
File name
-----       -----      ------    --------   ---------     -------   ---------     -------   ---------    ---      ------      ------   ---------    ---
    1          17          17       1.000        .065          17        .065           0        .000      6           0           0        .000     15
/u01/app/oracle/oradata/TEST/datafile/o1_mf_system_938s4mr3_.dbf
    3         665         665       1.000        .020         665        .020           0        .000      6           0           0        .000     15
/u01/app/oracle/oradata/TEST/datafile/o1_mf_undotbs1_938s5n46_.dbf
    5         631      80,002     126.786        .000           2        .045         629        .000      6           0           0        .000     17
/u01/app/oracle/oradata/TEST/datafile/o1_mf_test_8k__cz1w7tz1_.dbf
As expected I’ve done a number of multiblock reads of my data tablespace for a total of roughly 80,000 blocks read. What you may not have expected is that I’ve done 665 single block reads of the undo tablespace.
What have I been doing with all those undo blocks ? Check the session stats:
Session stats
-------------
Name                                                                     Value
----                                                                     -----
transaction tables consistent reads - undo records applied              10,014
transaction tables consistent read rollbacks                                10
We’ve been reading undo blocks so that we can create read-consistent copies of the 10 undo segment headers that were active in my instance. We haven’t (and you’ll have to trust me on this, I can’t show you the stats that aren’t there!) reported any “data blocks consistent reads – undo records applied”.
If you want to see a detailed explanation of what has happened you’ll need to read Oracle Core (UK source), chapter 3 (and possibly chapter 2 to warm yourself up for the topic). In outline the following type of thing happens:
- Oracle gets to the first block updated in t1 and sees that there’s an ITL (interested transaction list) entry that hasn’t been marked as committed (we flushed the block from memory before the commit cleanout could take place so the relevant transaction is, apparently, still running and the row is still marked as locked).
- Let’s say the ITL entry says the transaction was for undo segment 34, transaction table slot 11, sequence 999. Oracle reads the undo segment header block for undo segment 34 and checks transaction table slot 11, which is now at sequence 1032. Oracle can infer from this that the transaction that updated the table has committed – but can’t yet know whether it committed before or after the start of our “long running query”.
- Somehow Oracle has to get slot 11 back to sequence 999 so that it can check the commit SCN recorded in the slot at that sequence number. This is where we see “undo records applied” to make the “transaction table read consistent”. It can do this because the undo segment header has a “transaction control” section in it that records some details of the most recent transaction started in that segment. When a transaction starts it updates this information, but saves the old version of the transaction control and the previous version of its transaction table slot in its first undo record, consequently Oracle can clone the undo segment header block, identify the most recent transaction, find its first undo record and apply it to unwind the transaction table information. As it does so it has also wound the transaction control section backwards one step, so it can use that (older) version to go back another step … and so on, until it takes the cloned undo segment header so far back that it takes our transaction table slot back to sequence 999 – and the job is done, we can now check the actual commit SCN. (Or, if we’re unlucky, we might receive an ORA-01555 before we get there)
So – no changes to the t1 table during the query, but lots of undo records read because OTHER tables have been changing.
Footnote:
In my example the tablescan used direct path reads – so the blocks that went through delayed block cleanout were in private memory, which means they weren’t in the buffer cache and didn’t get written out to disc. When I flushed the buffer cache (again to emulate aging our of undo blocks etc.) and repeated the tablescan Oracle had to go through all that work of creating read consistent transaction tables all over again.
Shoney’s Hit By Apparent Credit Card Breach
Krebs on Security
It’s Friday, which means it’s time for another episode of “Which Restaurant Chain Got Hacked?” Multiple sources in the financial industry say they’ve traced a pattern of fraud on customer cards indicating that the latest victim may be Shoney’s, a 70-year-old restaurant chain that operates primarily in the southern United States.

Shoney’s did not respond to multiple requests for comment left with the company and its outside public relations firm over the past two weeks.
Based in Nashville, Tenn., the privately-held restaurant chain includes approximately 150 company-owned and franchised locations in 17 states from Maryland to Florida in the east, and from Missouri to Texas in the West — with the northernmost location being in Ohio, according to the company’s Wikipedia page.
Sources in the financial industry say they’ve received confidential alerts from the credit card associations about suspected breaches at dozens of those locations, although it remains unclear whether the problem is limited to those locations or if it extends company-wide. Those same sources say the affected locations were thought to have been breached between December 2016 and early March 2017.
It’s also unclear whether the apparent breach affects corporate-owned or franchised stores — or both. In last year’s card breach involving hundreds of Wendy’s restaurants, only franchised locations were thought to have been impacted. In the case of the intrusion at Arby’s, on the other hand, only corporate stores were affected.
The vast majority of the breaches involving restaurant and hospitality chains over the past few years have been tied to point-of-sale devices that were remotely hacked and seeded with card-stealing malicious software.
Once the attackers have their malware loaded onto the point-of-sale devices, they can remotely capture data from each card swiped at that cash register. Thieves can then sell the data to crooks who specialize in encoding the stolen data onto any card with a magnetic stripe, and using the cards to buy gift cards and high-priced goods from big-box stores like Target and Best Buy.
Many retailers are now moving to install card readers that can handle transactions from more secure chip-based credit and debit cards, which are far more expensive for thieves to clone. Malware that makes it onto point-of-sale devices capable of processing chip card transactions can still intercept data from a customer’s chip-enabled card, but that information cannot later be used to create a cloned physical copy of the card.
Character selectivity
Oracle Scratchpad
A recent OTN posting asked how the optimizer dealt with “like” predicates for character types quoting the DDL and a query that I had published some time ago in a presentation I had done with Kyle Hailey. I thought that I had already given a detailed answer somewhere on my blog (or even in the presentation) but found that I couldn’t track down the necessary working, so here’s a repeat of the question and a full explanation of the working.
The query is very simple, and the optimizer’s arithmetic takes an “obvious” strategy in the arithmetic. Here’s the sample query, with the equiavalent query that we can use to do the calculation:
select * from t1 where alpha_06 like 'mm%';

select * from t1 where alpha_06 >= 'mm' and alpha_06 < 'mn';
Ignoring the possible pain of the EBCDIC character set and multi-byte national-language character sets with “strange” collation orders, it should be reasonably easy to see that ‘mn’ is the first string in alphabetical order that fails to match ‘mm%’. With that thought in mind we can apply the standard arithmetic for range-based predicates assuming, to stick with the easy example, that there are no histograms involved. For a range closed at one end and and open at the other the selectivity is:
( ( 'mn' - 'mm') / (high_value - low_value) ) + 1/num_distinct
The tricky bits, of course, are how you subtract ‘mm’ from ‘mn’ and how you use the values stored in the low_value and high_value columns of view user_tab_cols. So let’s generate the orginal data set and see where we go (running on 12c, and eliminating redundant bits from the original presentation):
rem
rem     Script:         selectivity_like_char.sql
rem     Author:         Jonathan Lewis
rem     Dated:          Sep 2013
rem

execute dbms_random.seed(0)

create table t1 nologging as
with generator as (
        select rownum id
        from dual
        connect by rownum <= 1000
)
select
        cast(dbms_random.string('l',6) as char(6))      alpha_06
from
        generator,
        generator
where
        rownum <= 1e6 -- > comment to avoid WordPress formatting issue
;

execute dbms_stats.gather_table_stats(user,'t1',method_opt=>'for all columns size 1')

column low_value  format a32
column high_value format a32

select
        column_name,
        num_distinct,
        density,
        low_value,
        high_value
from
        user_tab_cols
where
        table_name = 'T1'
order by
        column_name
;

select min(alpha_06), max(alpha_06) from t1;

set autotrace traceonly explain

select
        *
from
        t1
where
        alpha_06 like 'mm%'
;

set autotrace off
It will probably take a couple of minutes to generate the data – it’s 1M random strings, lower-case, 6 characters fixed – and will take up about 12MB of space. Here are the results from the stats and min/max queries, with the execution plan for the query we are testing:
COLUMN_NAME          NUM_DISTINCT    DENSITY LOW_VALUE                  HIGH_VALUE
-------------------- ------------ ---------- -------------------------- --------------------------
ALPHA_06                  1000000    .000001 616161616E72               7A7A7A78747A


MIN(AL MAX(AL
------ ------
aaaanr zzzxtz


Execution Plan
----------------------------------------------------------
Plan hash value: 3617692013

--------------------------------------------------------------------------
| Id  | Operation         | Name | Rows  | Bytes | Cost (%CPU)| Time     |
--------------------------------------------------------------------------
|   0 | SELECT STATEMENT  |      |   157 |  1099 |   265  (20)| 00:00:01 |
|*  1 |  TABLE ACCESS FULL| T1   |   157 |  1099 |   265  (20)| 00:00:01 |
--------------------------------------------------------------------------

Predicate Information (identified by operation id):
---------------------------------------------------
   1 - filter("ALPHA_06" LIKE 'mm%')
Given that there are power(26,6) = 308,915,776 different combinations available for lower-case strings of 6 charactgers it’s not too surprising that Oracle generated 1M different strings, nor is it particularly surprising that the lowest value string started with ‘aaa’ and the highest with ‘zzz’.
So how do we get 157 as the cardinality for the query or, to put it another way, how do we get 0.000157 as the selectivity of the predicate. We need to refer to a note I wrote a few years ago to help us on our way (with a little caveat due to a change that appeared in 11.2.0.4) – what number would Oracle use to represent ‘mm’ and the other three strings we need to work with ?
According to the rules supplied (and adjusted in later versions) we have to:
- pad the strings with ASCII nulls (zeros) up to 15 bytes
- treat the results as a hexadecimal number and convert to decimal
- round off the last 21 decimal digits
We can model this in SQL with a statement like:
SQL> column dec_value format 999,999,999,999,999,999,999,999,999,999,999,999
SQL> select round(to_number(utl_raw.cast_to_raw(rpad('aaaanr',15,chr(0))),'xxxxxxxxxxxxxxxxxxxxxxxxxxxxxxxx'),-21) dec_val from dual;

DEC_VAL
------------------------------------------------
505,627,904,294,763,000,000,000,000,000,000,000

1 row selected.
As an alternative, or possibly a cross-check, I created a table with a varchar2(6) column, inserted the four values I was interested in and created a histogram of 4 buckets on the column (there’s a suitable little demo at this URL) and got the following endpoint values:
ENDPOINT_NUMBER                                   ENDPOINT_VALUE
--------------- ------------------------------------------------
              1  505,627,904,294,763,000,000,000,000,000,000,000
              2  568,171,140,227,094,000,000,000,000,000,000,000
              3  568,191,422,636,698,000,000,000,000,000,000,000
              4  635,944,373,827,734,000,000,000,000,000,000,000
Once we’ve got these numbers we can slot them into the standard formula (not forgetting the 1/1,000,000 for the closed end of the predicate) – and to save typing I’m going to factor out 10^21 across the board in the division:
Selectivity = (568,191,422,636,698 – 568,171,140,227,094) / (635,944,373,827,734 – 505,627,904,294,763) + 1/1,000,000
Selectivity = 20,282,409,604 / 130,316,469,532,971 + 1/1,000,000
Selectivity = 0.00015564 + 0.000001 = 0.00015664
From which the cardinality = (selectivity * num_rows) = 156.64, which rounds up to 157. Q.E.D.


